Advanced Resolution Manager
A downloadable asset pack
If you are using HaxeFlixel, check out the FlxRes for easy multi resolution here. It is free and open source!
Beginners devs on GameMaker: Studio 2, are usually facing relatively early on their gamedev journey a common challenge, which is managing the resolution of their game. Nowadays, on most platforms and especially the mobile platform, there are countless different screens of various sizes and aspect ratios. The Advanced Resolution Manager for GameMaker: Studio 2 is hopefully a handy GML script that will do the logic/code part of the job, letting you focus on other aspects of your project.
The Advanced Resolution Manager for GameMaker: Studio 2 is absolutely free (MIT License), open source and very easy to use. I am providing here four example projects to get started.
Contents
- Prerequisites, Compatibility and Limitations
- What the script does and how to use it
- Landscape Orientation Example Project (Desktop and Mobile)
- Portrait Orientation Example Project (Mobile only)
- Dynamic Orientation Example Project (Mobile only)
- Dynamic Window Resize (Desktop only)
- Supplementary scripts
- Support this project
Prerequisites, Compatibility and Limitations
Prerequisites
GMS2.3+ is required for the example projects. Additionally you will find here only the GMS2.3+ version of the script. For the GMS2.x version, prior GMS2.3+, you can find the script here (GameMaker Community Forum).
This script is heavily based on the Resolution and Aspect Ratio Management for Game Maker tutorial series by Pixelated Pope. If you have not watched them yet, do yourself the favor to watch them. They are contain essential concepts about resolution management.
Compatibility
I wrote this script with mobile development primarily in mind, but is also suitable for desktop targets and pixel art graphics. It is working 100% as it should on mobile and desktop targets but it has not been tested on UWP, HTML5 and any console target.It have not been tested on UWP, HTML5 and consoles module, so if you happen to own a license of one or more of those platforms and tried the script, please let me know if it is working correctly or even contribute to the script with your platform specific adaptations.
Please note that when targeting desktop the parameter _is_orientation_vertical should be false. Also mobile quality of life features are intended for mobile projects. If the project is cross platform, you should use those features only when working the mobile aspects of your project. The mobile quality of life features are _is_orientation_vertical as true, and the optional arguments: scale and overide_other_value. The scale argument can be used on desktop target but it will be in effect, only on windowed mode and will be ignored in full screen mode. If you try to use overide_other_value on desktop target, significant distortions will occur while on full screen mode.
Limitations
Here are the three known limitations, along with their solutions:
1. If the game window is bigger that your monitor screen, GMS will scale it unevenly causing distortion on graphics.
Affects VM->Test builds with is_design_value_vertical as true. It does not affect landscape aspect ratios and it does not affect any build on actual mobile devices.
Solution: Use the optional scale argument to scale the window down in order to fit inside your monitor.
2. When working on VM->Test builds with is_design_value_vertical as true, if the application surface is enabled the graphics are heavily distorted.
Affects VM->Test buildswith is_design_value_vertical as true. It does not affect landscape aspect ratios and it does not affect any build on actual mobile devices.
Solution: Enable and use the application surface, conditional based on os_type, so you can keep enjoying the "faking" portrait orientation on VM->Test builds.
3. When working on VM->Test builds with is_design_value_vertical as true, if window_set_fullscreen is enabled the graphics are heavily distorted. It does not make sense to use window_set_fullscreen enabled with VM->Test build with is_design_value_vertical as true, anyway...
Affects VM->Test builds with "faking" portrait orientation only. It does not affect landscape aspect ratios and it does not affect any build on actual mobile devices. The build on an actual mobile device will be full screen anyway...
Solution: Unless getting a second monitor and oriented it vertically or orient vertically your main monitor, there is not any actual solution nor needed one...
What the script does and how to use it
The scripts has two primary uses:
- To help developers handling multi-resolution easier.
- To offer to mobile developers a couple of quality of life features.
The script accepts 1 mandatory and 5 optional arguments (total of 6):
set_resolution (design_value, is_design_vertical (optional), is_orientation_vertical (optional), resize_all_rooms (optional), scale (optional), overide_other_value (optional))
- design_value (real) - One of the most important decisions that should be taken, is the design resolution of the game. The design (or ideal) resolution is the resolution that your graphic assets will look as intended without any scaling. The first argument is very flexible; you can pass either the width or the height of your ideal resolution the remaining one will be calculated by the script.
- is_design_value_vertical (boolean) - Optional argument. Here you specify if the first argument is referring to width (false) or height (true) of your ideal resolution. Will be false if omitted.
- is_orientation_vertical (boolean) - Optional argument. Here you specify if the orientation of the game is landscape (false) or portrait (true). This argument as true is indented for mobile development only. Will be false if omitted.
- resize_all_rooms (boolean) - Optional argument. It will resize all rooms except the 0 indexed one, to the resulted resolution from the previous arguments, if true. Some games have fixed room dimensions (eg break out clones, card games) while others not (rpgs, platformers); pass true or false accordingly. Please note that if you hand place objects in room editor then you should set this parameters as false. Will be false if omitted.
- scale (real) - Optional argument. Nowadays most mobile devices have bigger screen resolution than a desktop or laptop screen. This may be inconvenient, especially if the mobile game that is being developed has portrait orientation. You can pass a custom scale to fit the game window within your monitor. The scale only effects builds on os_windows and os_macosx (usually you build Test->VM on them) and is ignored on device or emulator builds. On desktop targets will only take effect while on windowed mode and while full screen mode will be ignored.
- overide_other_value (real) - Optional argument. You can pass the other ideal dimension than the one you passed on first argument to make a customized screen ratio for a quick sneak peek without using real device or emulator. If you passed the ideal width on first argument, you can pass a height value here and vice versa. Like scale argument, it will ignored on device or emulator builds. This argument is indented for mobile development only.
Landscape Orientation Example Project
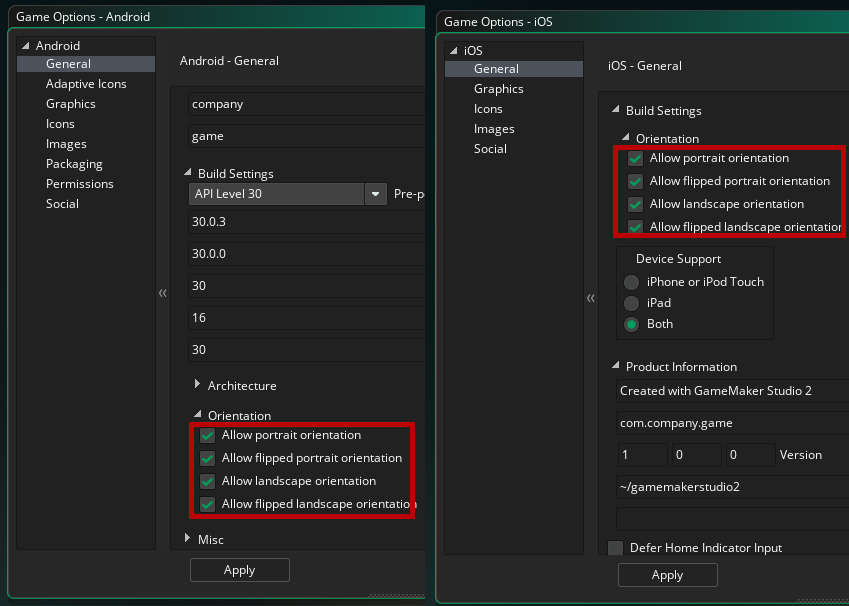
Before building the example project on an actual device, make sure you have the correct settings on Game Options - Android and/or on Game Options - iOS.
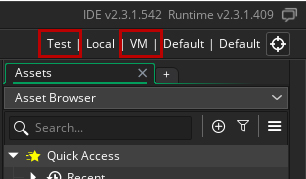
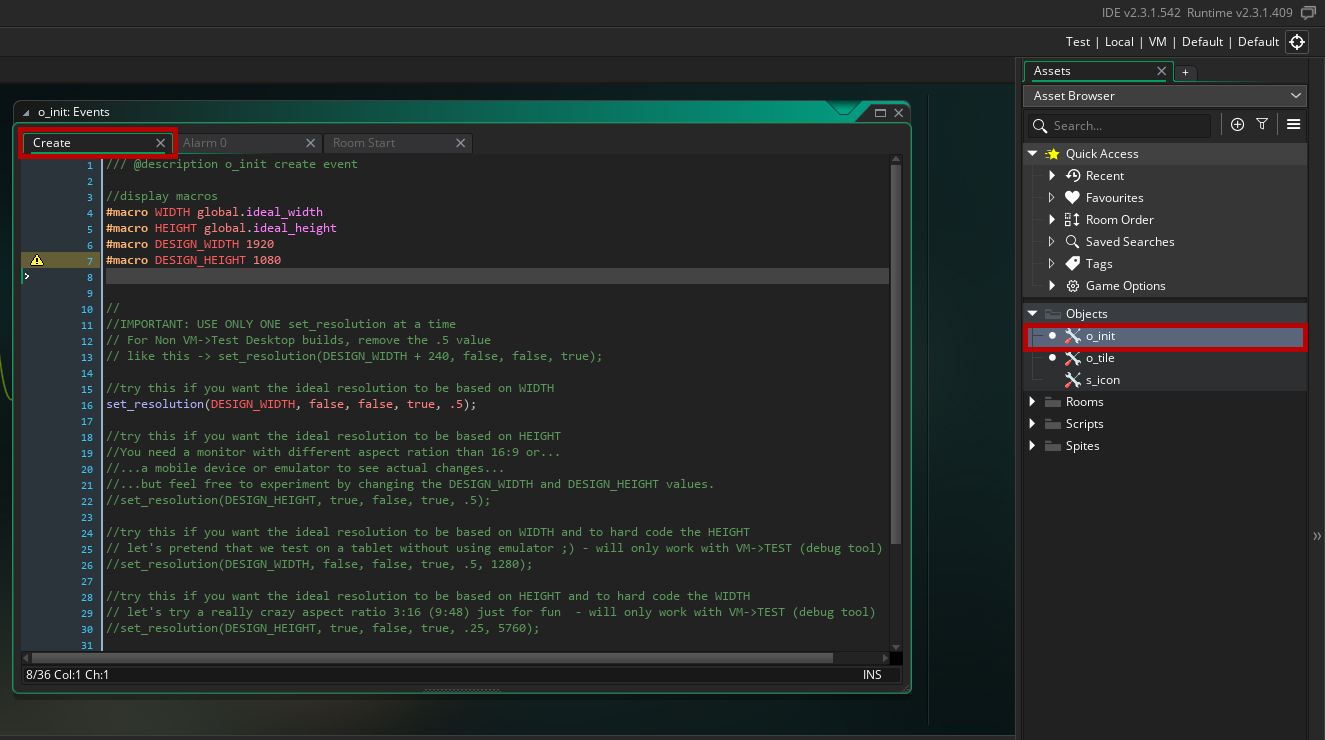
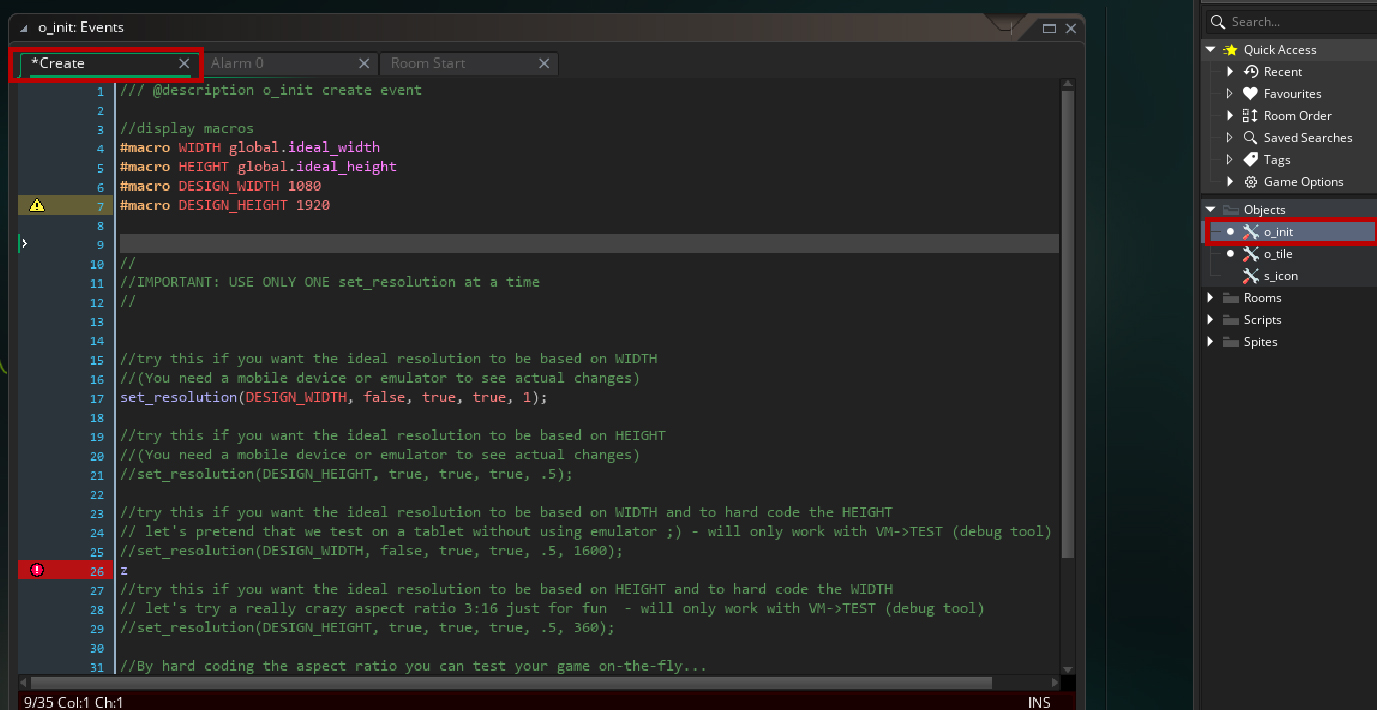
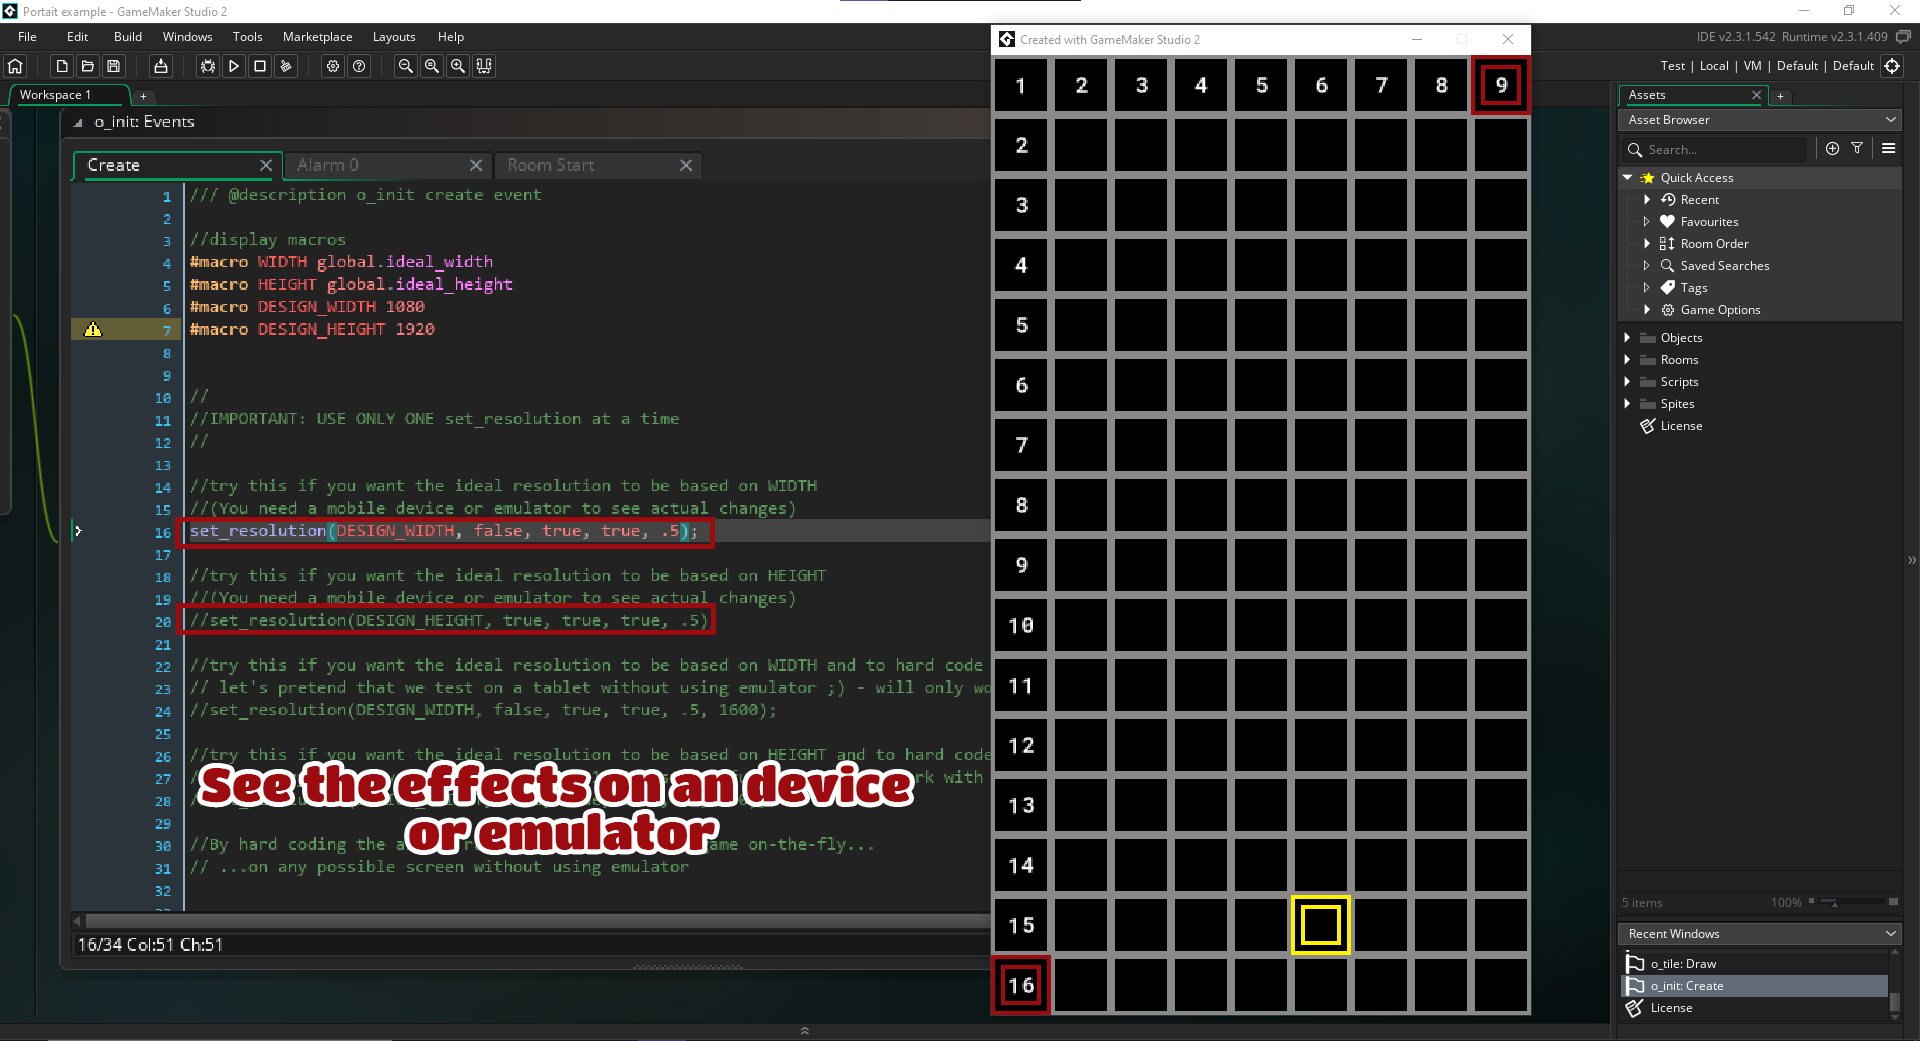
Find the object o_init in the assets tree and go to its Create Event.
Build the project with Test->VM.
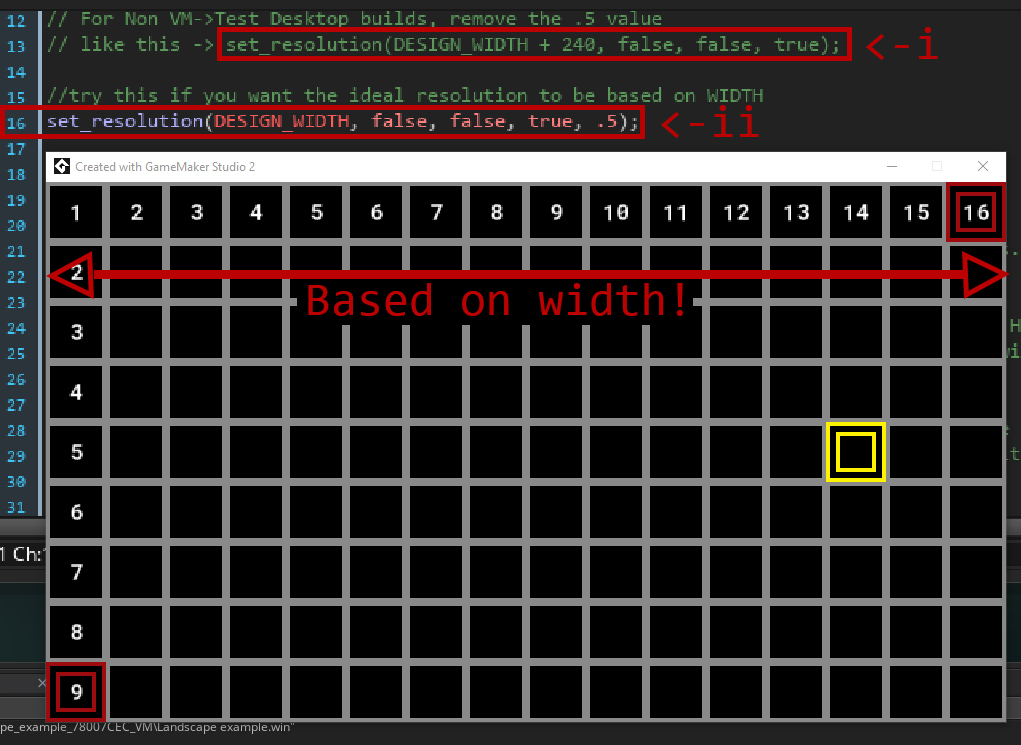
(ii) The script has been called on line 16. The DESIGN_WIDTH (1920) value is passed:
set_resolution(DESIGN_WIDTH,...
We make clear that the value we passed is the width (false):
set_resolution(DESIGN_WIDTH, false,...
The orientation is horizontal (false):
set_resolution(DESIGN_WIDTH, false, false,...
All the game rooms are resized (true)...
set_resolution(DESIGN_WIDTH, false, false, true,...
And finally the scale (0.5) reduces the Test-VM builded window to half, thus, allowing us to test/debug while seeing the output data in GMS.
set_resolution(DESIGN_WIDTH, false, false, true, .5);
Please note that the scale will be ignored on mobile device builds and that is not intended for production desktop builds.
Back to our Test->VM build! What do we see here? Each grey square is 120x120 pixels. Some logic in the object o_tile, divides the resolution of each of my monitor's dimension (which is 1920x1080) with the size of the tile (120 pixels). My monitor resolution is the same as the design (ideal) resolution, so we have:
1920 / 120 =  16 tiles fitting perfectly horizontally
1080/120 = 9 tiles fitting perfectly vertically
The result of the division is rounded up with ceil. That means that depending the screen resolution, the last tile of each dimension, may not be fully visible.
The last tile of each dimension is red. The red tiles and the yellow one that is moving around are being drawn with the DRAW UI Event, just to demonstrate the accuracy of a BONUS UI script that included in the example projects, but more of the UI script later.
Now Let's build the project on a mobile device:

This device is the Cubot P20 and has screen resolution 2280 x 1080. The GMS will scale based on DESIGN_WIDTH, so we see again 16 tiles that fit perfectly on the 2280 pixels width. The aspect ratio of this screen is 2.11, so vertically we see 8 gray tiles and a tiny fraction or the last red tile.
Now let's build with DESIGN_HEIGHT as our resolution basis.
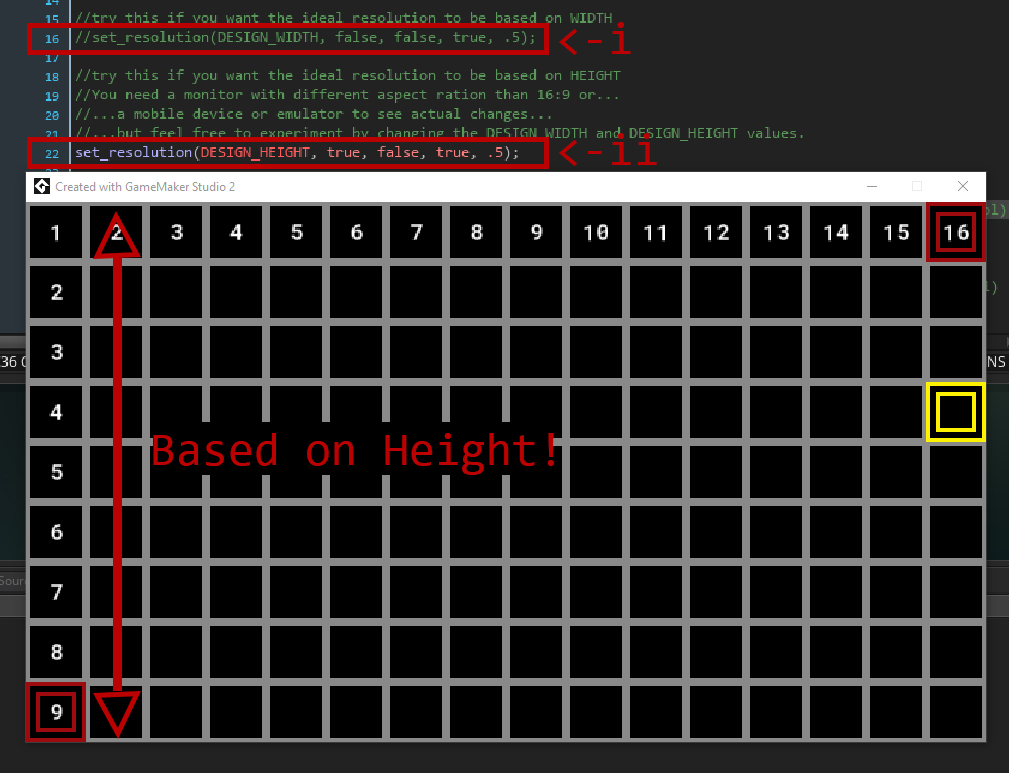
Since my monitor's resolution is the same with the design (ideal) resolution there is not a noticeable difference, but on a screen with different aspect ratio scaling would be quite different. Let's build it on a mobile device again.
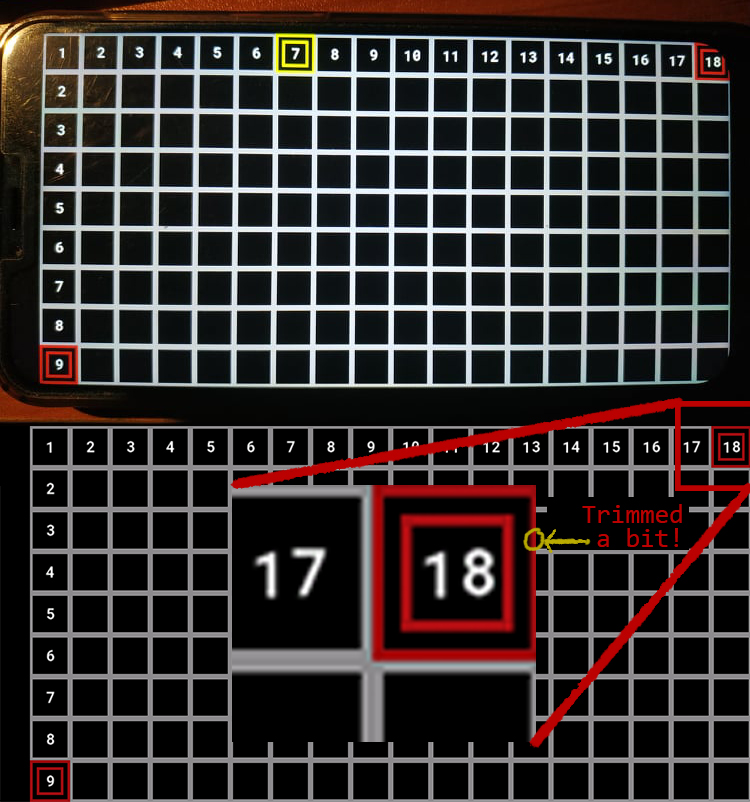
As we said earlier, this device is the Cubot P20 and has screen resolution 2280 x 1080. The GMS coincidentally will not scale based on DESIGN_HEIGHT because is the same as the ideal height and we see 9 tiles vertically that fit perfectly on the 1080 pixels height. We would see 9 tiles vertically that fit perfectly even if the height of the screen was different. The aspect ratio of this screen is 2.11, so horizontally we see 18 tiles. The 18th tile is trimmed a bit.
Choosing ideal width vs ideal height is based on many factors of the game, like game mechanics, orientation of action, orientation of scrolling...etc...
Now let's play a bit with the last argument overide_other_value. This argument is a real time saver. You can override the other dimension and test on every possible aspect ratio without using the Android Virtual Device. A common aspect ratio for tablets is 3:2, so if we have as ideal width 1920, we would have 1280 as height.

At this build, we have 16 tiles that fit perfectly on our ideal width and (16/3*2=)10.66 tiles vertically.
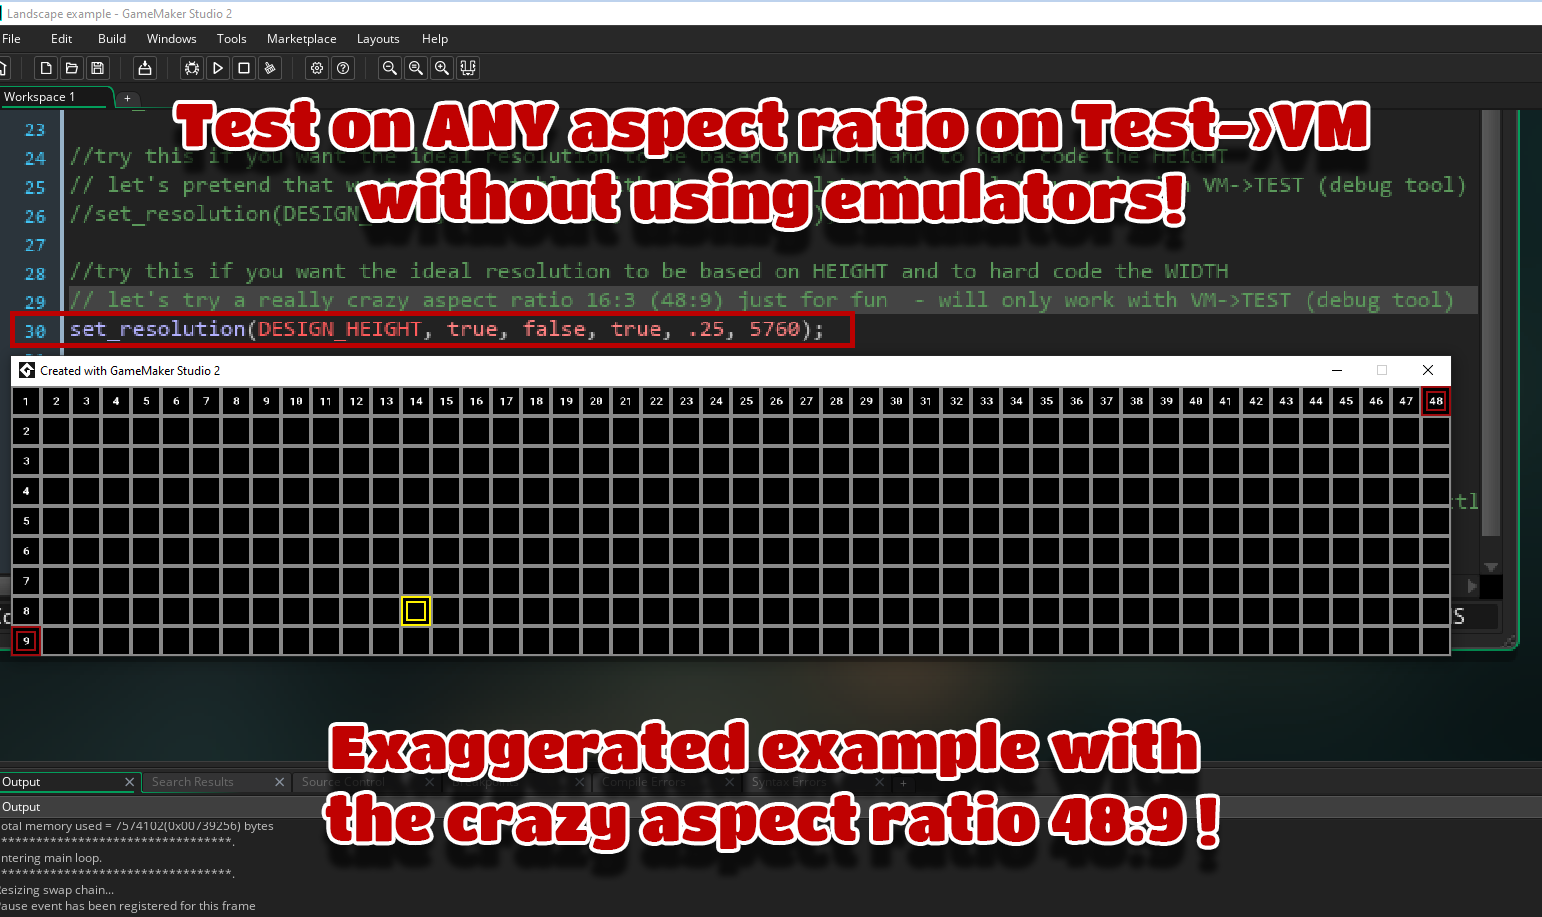
We can test ANY aspect ratio. Let's exaggerate for fun and build with the crazy resolution 5760x1080 (16:3 aspect ratio)
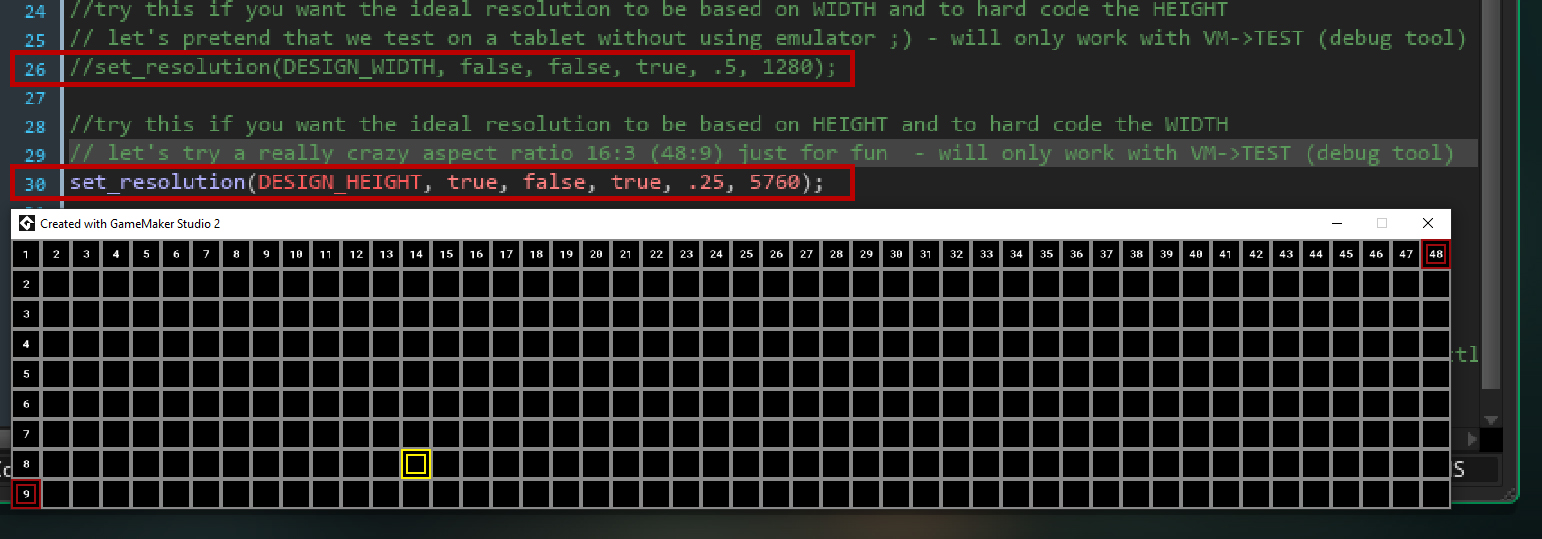
Notice that I reduced the scale to 0.25 in order the window to fit properly in my monitor's screen.
Feel free to explore the project and experiment on it. We will see the other two display scripts and how to use them after exploring all 3 example projects.
Now let's see the next example project.
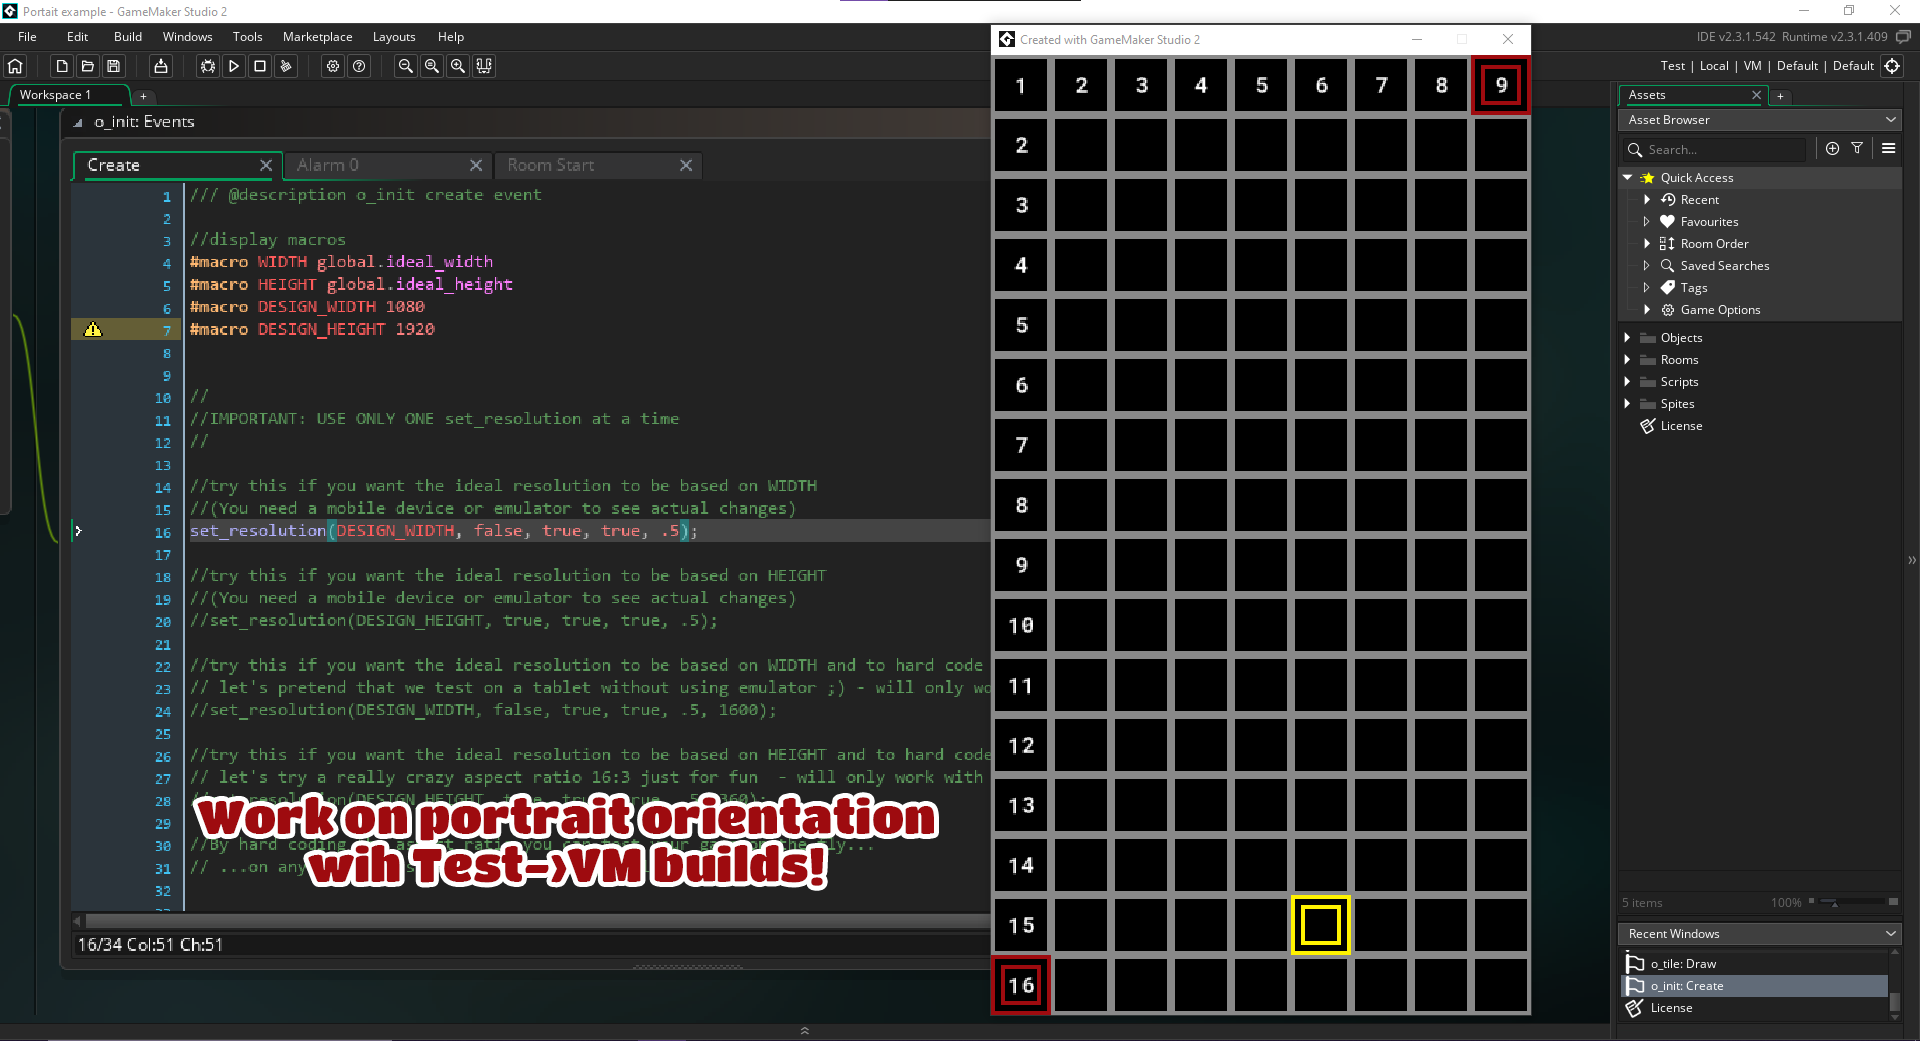
Portrait Orientation Example Project
Before building the example project on an actual device, make sure you have the correct settings on Game Options - Android and/or on Game Options - iOS.

Find the object o_init in the assets tree and go to its Create Event.
This page is already too long, so better not make it way longer. Just follow similar steps as the previous example, comment and un-comment lines accordingly and observe the results. By now they should be self-explanatory.

Dynamic Orientation Example Project (BONUS)
Before building the example project on an actual device, make sure you have the correct settings on Game Options - Android and/or on Game Options - iOS.
This project will only make sense to build on an actual device.
See the comments in the code. It should be easy to understand how it works by now...
Dynamic Window Resize Example Project (BONUS 2)
Before building the example project on an actual device, make sure you have the correct settings on Game Options - Windows
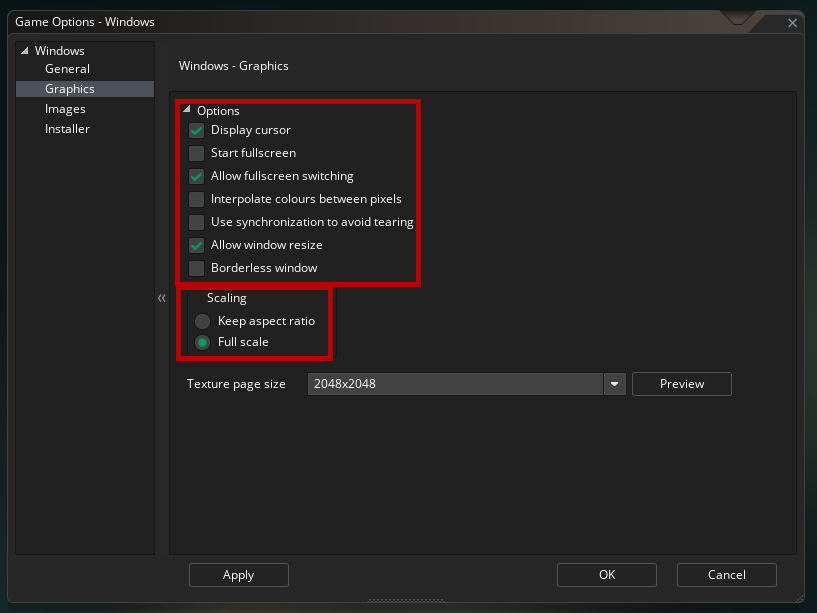
This project demonstrates how to handle window resizing on locked aspect ratio.
Unfortunately, is not possible to free resize the window without graphical distortions without altering the core of the script because of its proportional handling, thus, is outside of the scope of this script. But feel free to alter it if you need such a feature yourself...
I also added a simple sprite to move it around and while testing this example (it is not shown in this gif).
Supplementary scripts
The set_resolution function is the basis of the resolution handling but you need to set the camera in order to have actually results. The simpler way to do that is to use the function set_camera:
set_camera(x1, y1, x2, y2)
You just define a rectangle from its upper left corner (x1, y1) to its bottom right corner (x2, y2).
The set_resolution function stores the resulted resolution of the user's device into global.ideal_width and global.ideal_height. You should macro those two vars because you going to use them at every single room of your game.
#macro WIDTH global.ideal_width
#macro HEIGHT global.ideal_height
Make sure that you call the set_camera every time a room start. If you are not sure how to do that, check the example projects.
set_camera(0, 0, WIDTH, HEIGHT);
The camera may need some tweaking or If you need more complex camera functionality you should adapt accordingly. The possibilities are endless, I can only offer a solid basis for you to get started...
For more optimal dev experience use the set_gui_size function
set_gui_size(WIDTH);
If the orientation is not dynamic you can call it once at the 2nd room of your game (the first room should be only for initialization) per game session, but putting it together at room start with set_camera is fine too.
Support this project
If this project is useful to use, you can optionally support me:
- By giving feedback
- Report bugs
- Donate upon downloading
- Buy me a coffee


Download
Click download now to get access to the following files:
Development log
- Minor fixMar 08, 2023
- Are you using effect layers or surfaces? Read this!Jan 29, 2022
- Updated for GMS2.3.7.403 and laterJan 07, 2022
Comments
Log in with itch.io to leave a comment.
I like this system, but I'm having trouble getting it to work correctly with gpu_set_scissor(). It doesn't update the scissor region when resizing the window. The same code works when resizing the window without Advanced Resolution Manager. Am I missing something?
Using runtime version 2024.13.1.242, and the target is Windows.
Sorry for the inconvenience. As far I can tell, the issue should be that gpu_set_scissor() works in display pixel coordinates but not in game coordinates. So, when the window resizes, the scissor region doesn’t scale automatically with Advanced Resolution Manager.
A possible workaround, is to scale your scissor coordinates by the ratio between the window size and your game resolution. Calculate scale_x = window_get_width() / global.ideal_width and scale_y = window_get_height() / global.ideal_height, then multiply your scissor x, y, width, and height by these scale factors before passing them to gpu_set_scissor(). This workaround is purely theoretical though because my current schedule doesn’t allow me to write this fix and test it.
I’ll update the script with a proper fix after I ship my current project. Thanks for reporting this and for your patience.
Will this work with the latest version of GameMaker?
Last version I tested it was IDE 2024.11.0179 and runtime 2024.11.0.227 and I didn’t find any issue.
this works incredible well, this scripts are very useful the help to improve my project a lot, Thank you very much!!
Updated the Portrait example project. It had scale to 1 instead or .5