
FlxRes - Easy Multi Resolution for HaxeFlixel
A downloadable HaxeFlixel Template
If you are using GameMaker Studio 2, check out the Advanced Resolution Manager here. It is free and open source!
In my coding and game development journey, I have tried and even used in production several engines or frameworks, like Adobe AIR with pure flash (vector and CPU accelerated), Adobe AIR with Starling, GameMaker Studio 2, and HaxeFlixel to name some of them. One of the early challenges I had to face was common in all of them. Make my project/game looks as it should, in any screen, any resolution. Nowadays, on most platforms and especially the mobile platform, there are countless different screens of various sizes and aspect ratios. FlxRes hopefully will handle the logic/code part of the job, letting you focus on other aspects of your project.
FlxRes is a simple but effective resolution handler for HaxeFlixel, absolutely free (MIT License), open source and very easy to use.
Contents
- Overview
- Prerequisites, Compatibility and Limitations
- Download links
- The problem FlxRes solves
- How to use FlxRes
- Design width vs design height
- Using high definition assets
- Support this project
- Credits
Overview
FlxRes hopefully can make your project looks as it should on any screen, any resolution. FlxRes is easy multi resolution handling for HaxeFlixel. Its primary goal is to be simple, easy to use and accessible to beginners.
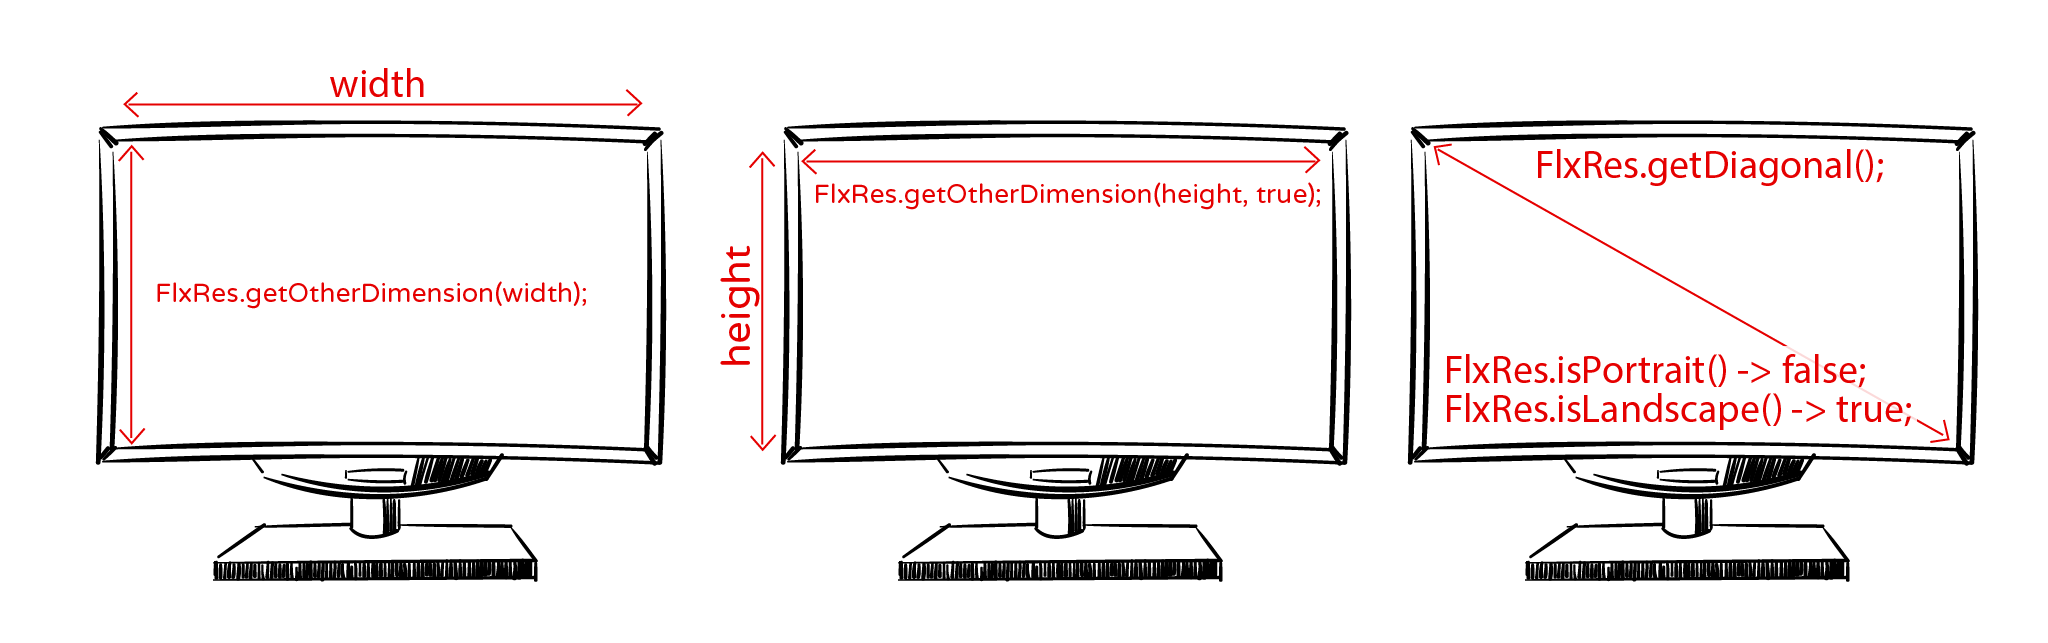
API overview
// provide the width, get the height
height = FlxRes.getOtherDimension(width);
// provide the height, get the width
width = FlxRes.getOtherDimension(height, true);
// get the aspect ratio of screen (if full screen) or the game window (if windowed)
ratio = FlxRes.getRatio();
// get the diagonal of screen (if full screen) or the game window (if windowed) in inches
diagonal = FlxRes.getDiagonal();
// returns true is the orientation is landscape
if (FlxRes.isLandscale()) trace("the orientation is landscape");
//  returns true is the orientation is portrait
if (FlxRes.isPortrait()) trace("the orientation is portrait");
Prerequisites, Compatibility and Limitations
Prerequisites
This project requires to have installed HaxeFlixel. Additionally you should have some basic familiarity with HaxeFlixel. At very minimum, you should be able to create a new project, edit it in your IDE of choice and build it for your desired target platform.
New to HaxeFlixel? Get started here!
Compatibility
This project should be compatible with all target platforms HaxeFlixel can export to. Please note that HTML5 has some issues (see the HTML5 builds at the bottom of this page).
Limitations
This project is not suitable if you want your project to has dynamic orientation on mobile targets. Provided that I can figure out an easy and beginner friendly way to implement it, I will add this feature in a future update. Additionally this project is for HaxeFlixel, thus, any limitations that may apply to HaxeFlixels, will apply to this project too.
Download links
- This repository contains the FlxRes within an example project. You can fork/clone/download this project and follow the instractions here, which is actually a tutorial on how to use FlxRes.
- You can also find this example project packed as zip on download section
- The assets and the extra code for the example can be removed easily. However you can download an empty template project containing only FlxRes on Downloads section or as release from the repo.
The problem FlxRes solves
If you are familiar with the black bars problem, skip this section
Let's see the problem FlxRes is trying to solve! Let's say you want to make a pixel art game. You have decided that your design resolution is 320x240.
The design resolution, is the resolution that your graphic assets look as they should, without using any scaling. When designing your game you should make some design decisions early, to avoid redoing work later. Design resolution is one of the most important decision you should decide as early as possible.
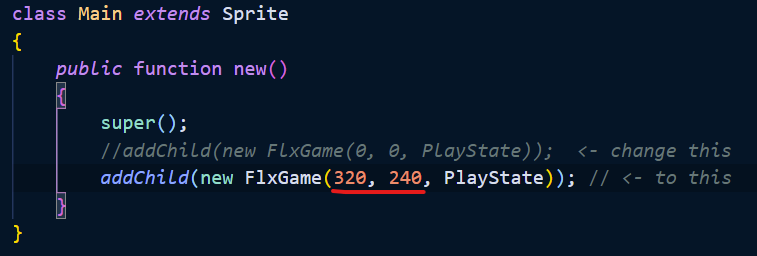
Create a new HaxeFlixel project, and go to the Main.hx file in source folder. Change the following line in public function new()
addChild (new FlxGame(0, 0, PlayState));
to
addChild (new FlxGame(320, 240, PlayState));
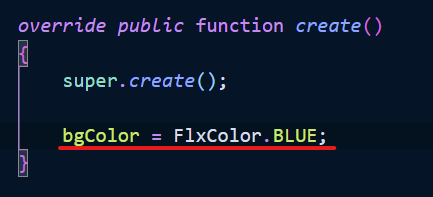
You just set your design resolution to HaxeFlixel! Let's add a background color. Go to PlayState.hx in source folder and add this line in override public function create() under super.create();
bgColor = FlxColor.BLUE;
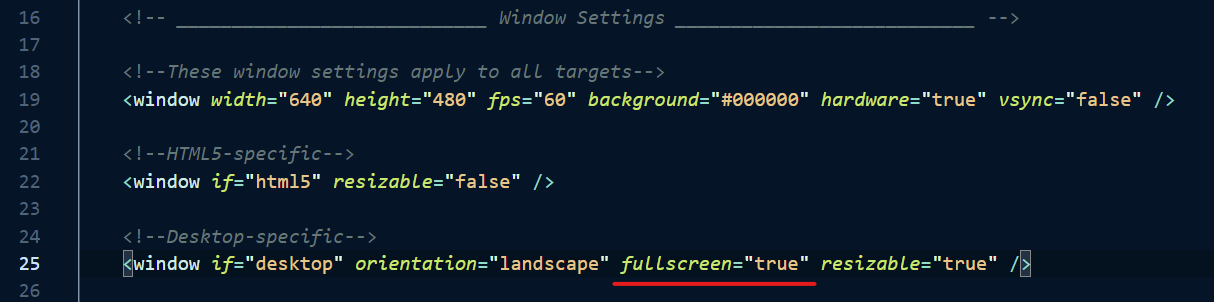
Let's try it on full screen. Go to Project.xml at the root folder of your project and change the line 25 and change the fullscreen from false to true:

Now build the project with neko or hashlink. The chances that your monitor aspect ratio is not 1.33 are high, so you possibly will see something like this:
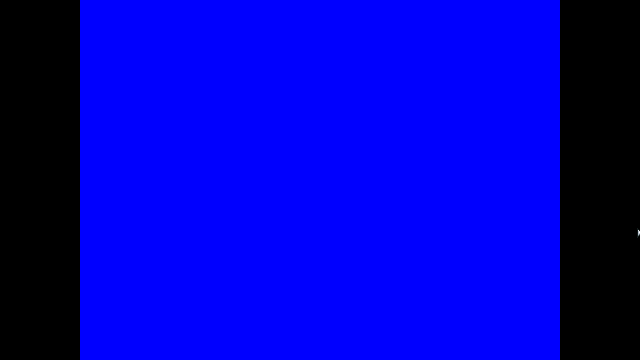
The black bars are not part of your game, but are part of the game's screen and the gaming experience. If we remove the values of the resolution we previously hard coded in Main.hx the black bars will be removed but then we are not providing the desired resolution. A pixel art game with 320x240 design resolution assets would look tiny in a FHD screen.
The black bars problems can be solved by the FlxRes. Additionally, FlxRes will automatically remove the black bars that might appear even in windowed mode, without any hard coding on your part.
How to use FlxRes
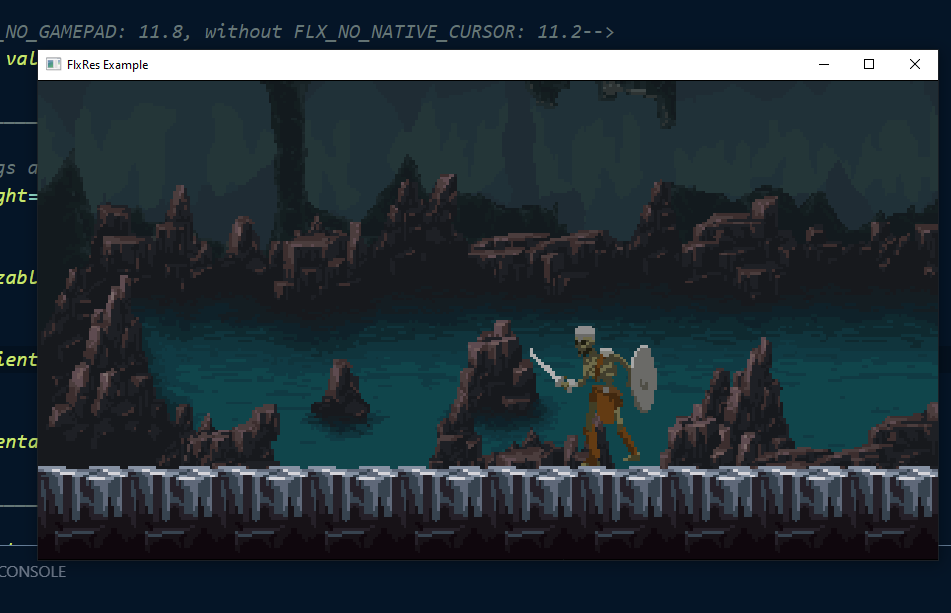
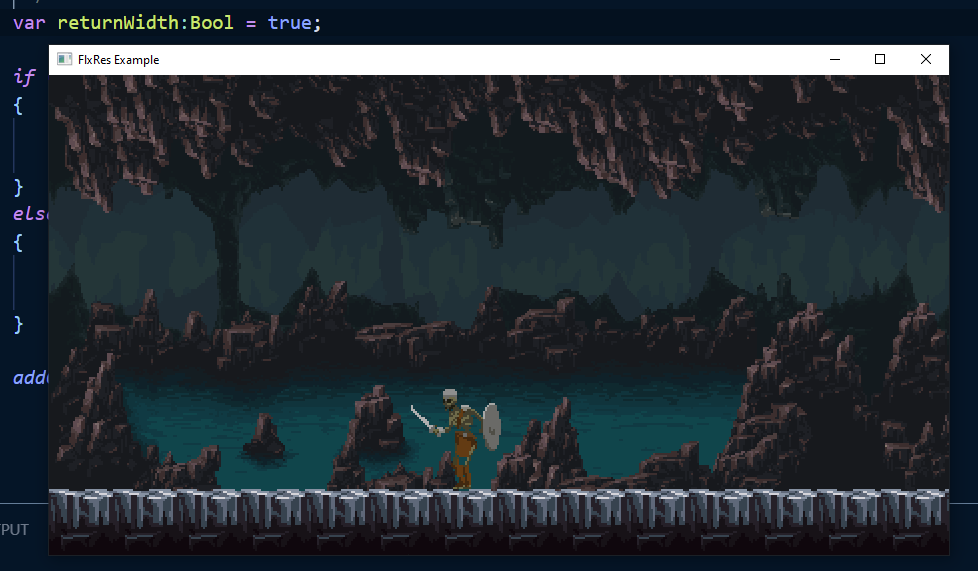
Download the example project and open it with your favorite IDE. Then built it with neko or hashlink. You will see a window with dimensions 640x480px (the default window size of a new empty HaxeFlixel project). You will also see a skeleton patrolling inside a cave. The skeleton's logic is patrolling from the edge of one side to the other, ensuring us that the resulted width of FlexRes calculations is correct. If the patrolling was shorter than the width of the window or longer (leaving outside of window) we could instantly tell.
The results of the FlexRes are not obvious now because the size of the window (640x480px) are double than our design resolution (320x240px), thus the result would be the same without FlexRes.
Now go to Project.xml and change at line 25 the fullscreen from false to true.
Build again the project with neko of hashlink. You will see the following:

As we saw in the previous section "The Problem FlxRes solves", normally we would see black bars left and right on the screen, but thanks to FlexRes this problem is solved! Switch back in Project.xml at line 25, the fullscreen from true to false. Next, we will inspect the source code and the assets of this example project.
The FlxRes class
Lets see the FlexRes class first. Go to source\flxres folder and open the FlexRes.hx file. We see a single static public function. That means that we can call this function whenever we want and from everywhere without creating an instance of FlexRes class.

This is how to use the function:
otherDimension = FlxRes.getOtherDimension(designValue, returnWidth);
The first argument designValue we pass the design or ideal width or height as integer. The assumption of design value as width or height is based on returnWidth.
The second argument is optional and is a Boolean. If omitted will be assumed as false. If we pass true, it will return the other dimension as width and will assume the designValue as height. If we pass false, it will return the other dimension as height and will assume the designValue as width. It will return the other dimension to otherDimension variable, based on the 2 arguments we pass. When we finally have both the ideal width and height, we will be able to create a new FlxGame with the ideal resolution.
If you are experienced enough as programmer, you will not only notice the small size of this class, but also its simplicity. While this is simple for an experienced programmer, it is the code I wish I could find when I got started. This code is for and dedicated to every beginner that just started coding with HaxeFlixel.
The assets of the example
Now let's see the assets of the example:
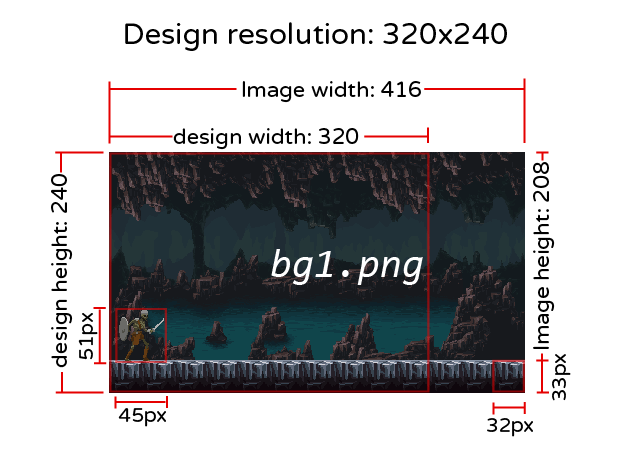
- The design resolution is 320x240px
- The bg1.png and bg2.png images are 416x208px
- The skeleton sprite is 45x51px
- And the ground tile is 32x33px
The assets can be found in the assets\images folder.
Using FlexRes with design width on landscape orientation
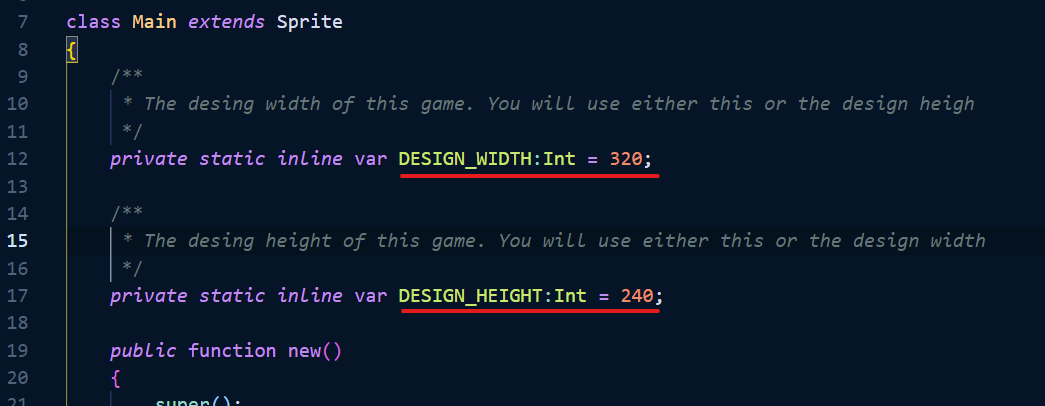
Let's inspect the Main.hx a bit. Under class Main extends Sprite there are 2 constants the DESIGN_WIDTH and the DESIGN_HEIGHT. Their values match the design resolution.
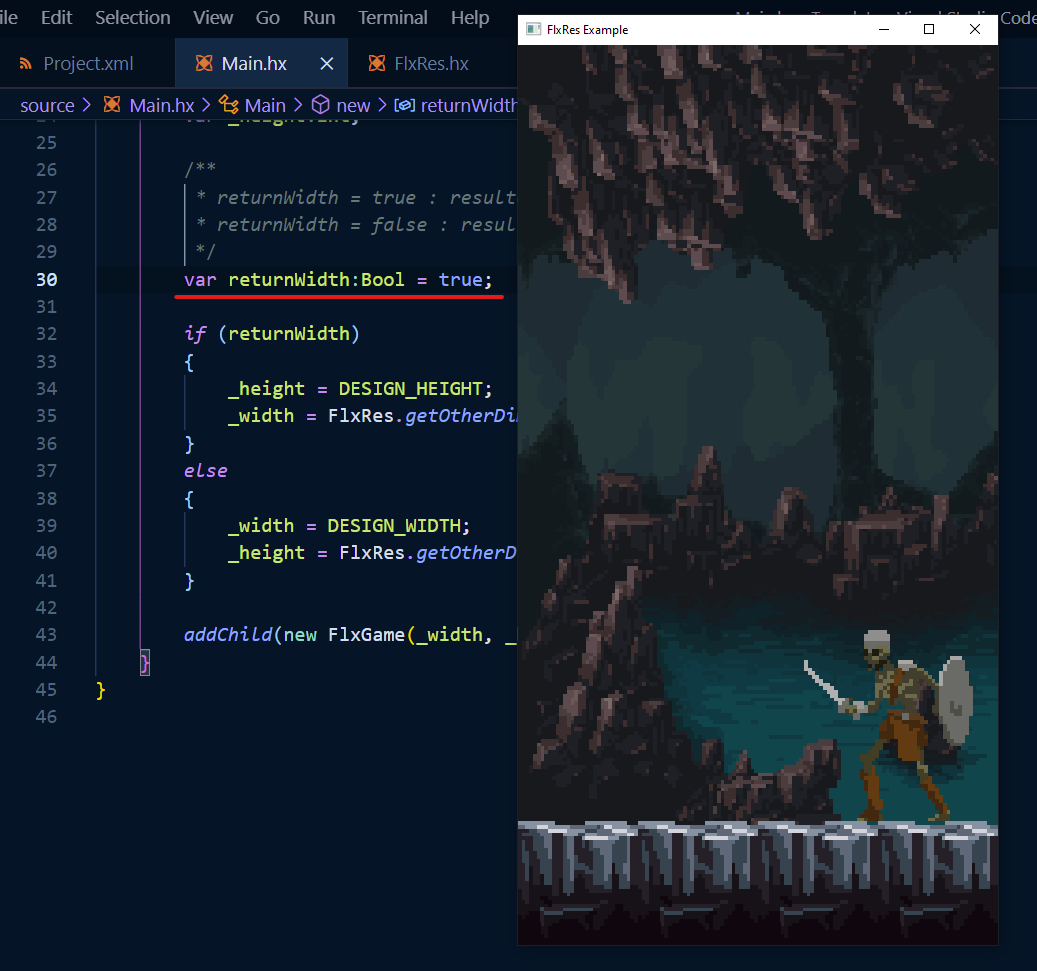
Let's see inside the public function new(). We declare two local variables _width and _height. We also declare the returnWidth variable as false. That means that we will provide to FlxRes the width as design value and it will calculate the other dimension, thus, the height (lines 39-40). Notice that we omitted the 2nd argument. It is optional and omitting it, means false.

Now go to Project.xml and at line 19 change the width from 640 to 900. Also make sure that you have switched back the fullscreen from true to false at line 25.
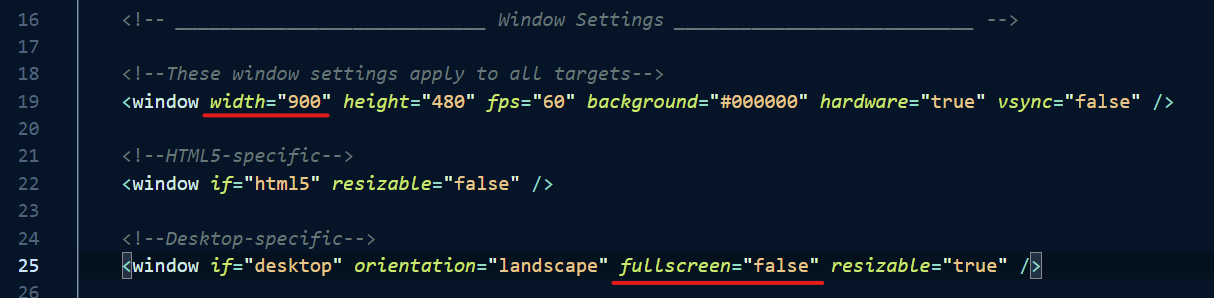
Now build with neko or hashlink. You will see a wider window of aspect ratio 1.87. FlxRes is taking care of the logic part of resolution handling, thus, no need to actually mess with or hard code in the source code. Just changing the appropriate values in Project.xml is enough!
You can also build on android, but with landscape orientation it does not really matter. The output will be about the same more or less... Just take in mind that the first android build will be quite long.
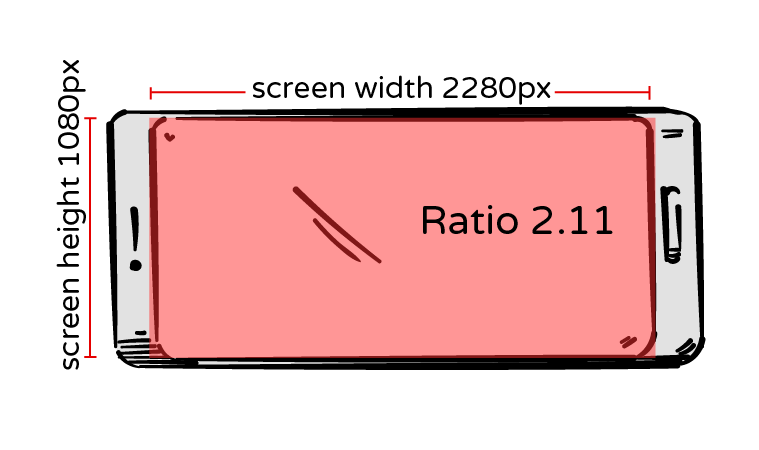
The aspect ratio of 1.8 and even wider than that, is very common for mobile devices. The Cubot P20 has aspect ratio of 2.11. Next there is a rough sketch that depictures a mobile device with the wide aspect ratio of 2.11. While at landscape orientation the width is greater than height, thus same things applies more of less with the desktop builds, resolution wise.
Now it is time to see what is the difference if the width is chosen over the height as passing design value to FlxRes and vise versa.
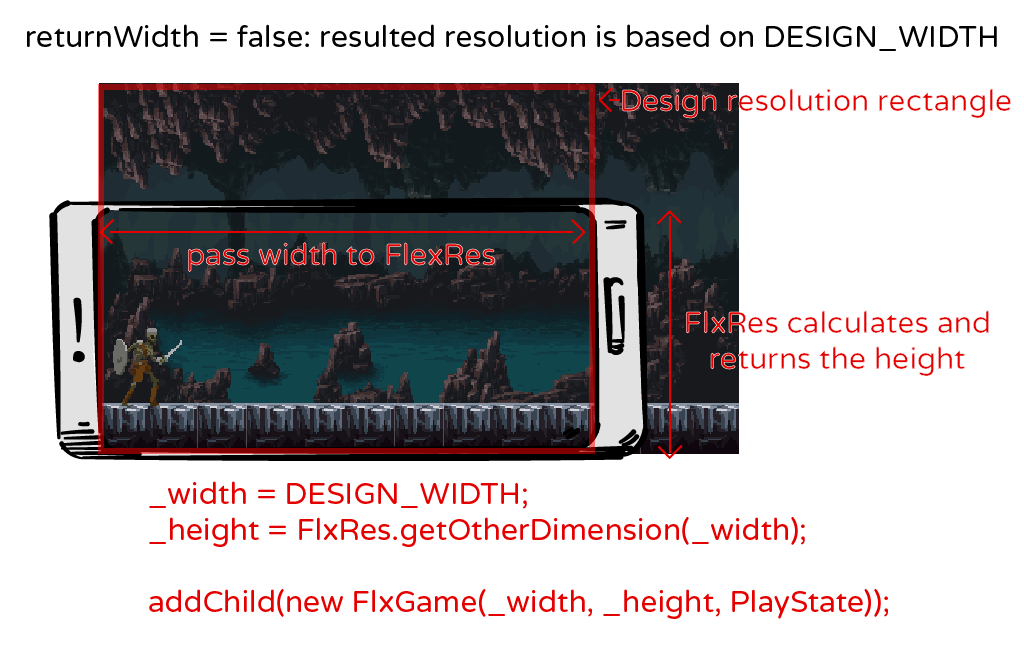
If we pass the design width to FlexRes, the bg1.png will be visible up to 320px of its total width of 416px. The FlexRes will calculate and return the height. In this case will be:
height = screenHeight * designWidth / screenWidth <=> height = 1080 * 320 / 2280 <=> height = 151.57
Then the result will be rounded down (Math.floor(151.57) = 151) and will be be made sure that the returned height is an even number by adding 1 to the height if it is odd. So the returned height will be 152.
Lets evaluate the result: 320 / 152 = 2.105
Pretty close to the screens ratio 2.11. Unless the result of the division of the screen resolution / ideal resolution are integers, the screen ratio and ideal resolution ratio will never be 100% the same, but they will be pretty close. So there are in this case some very thin black bars but they are unnoticeable.
One reason the final result should be an even number, is because of the fact that there is possibly no monitor with odd numbers resolution. Another reason is to avoid distortions on pixel art assets.
Using FlexRes with design height on landscape orientation
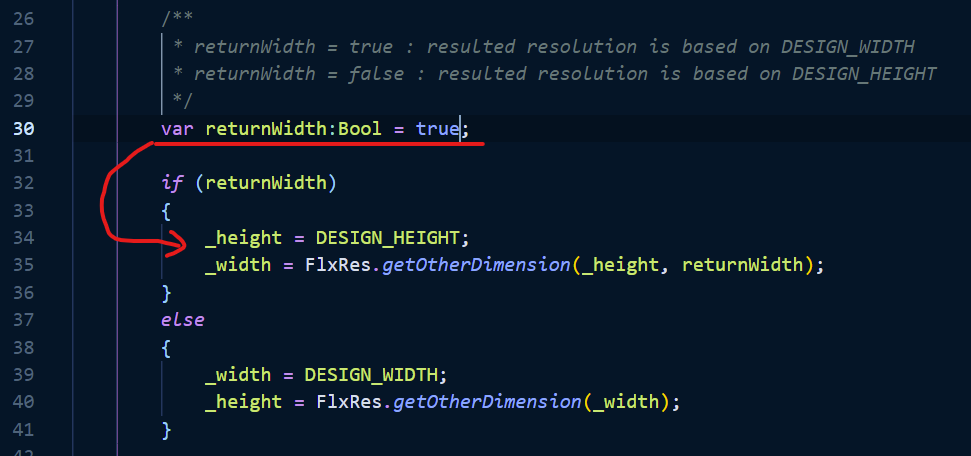
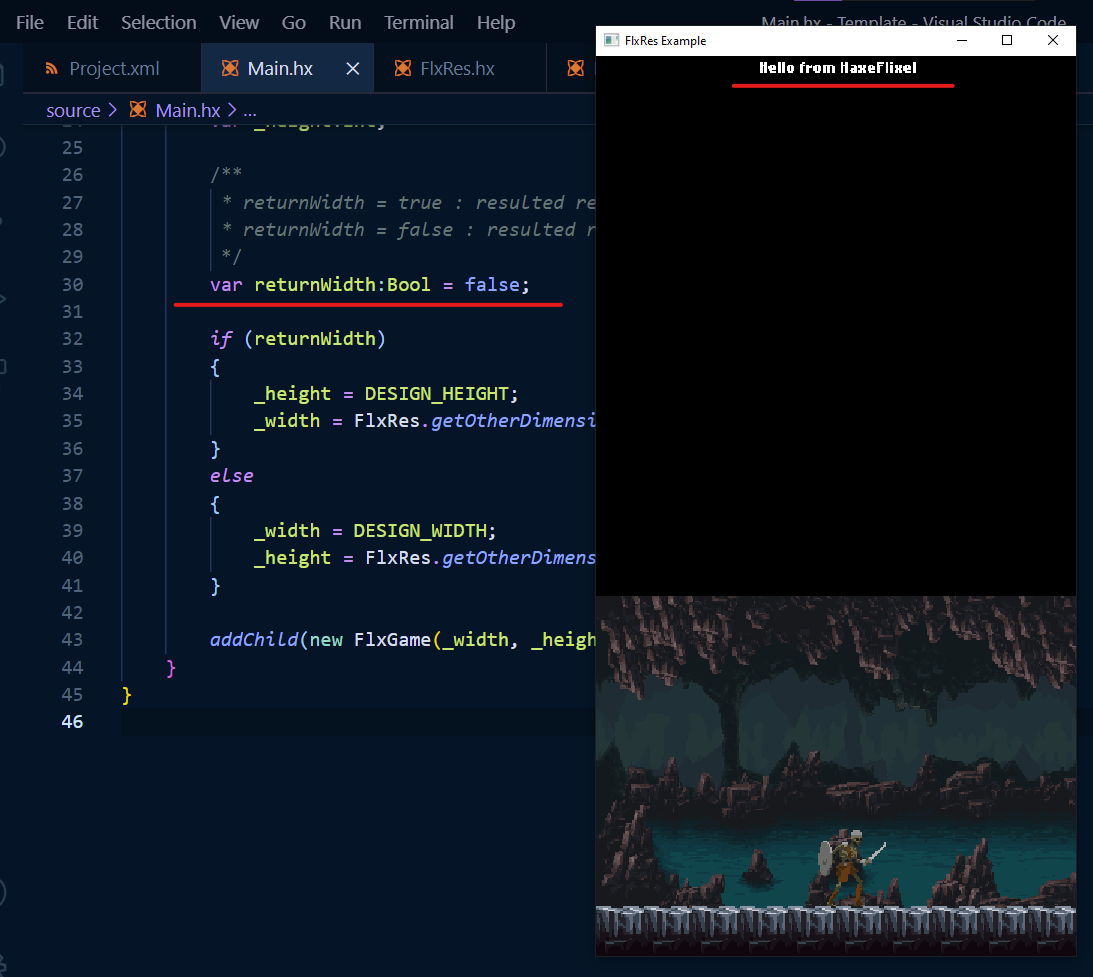
Go to Main.hx and switch the variable returnWidth to true. What way we provide to FlxRes the height in order to return the width (lines 34-35).
Build the project with neko or hashlink. If you prefer you can even build for android. You will see a slightly different result.
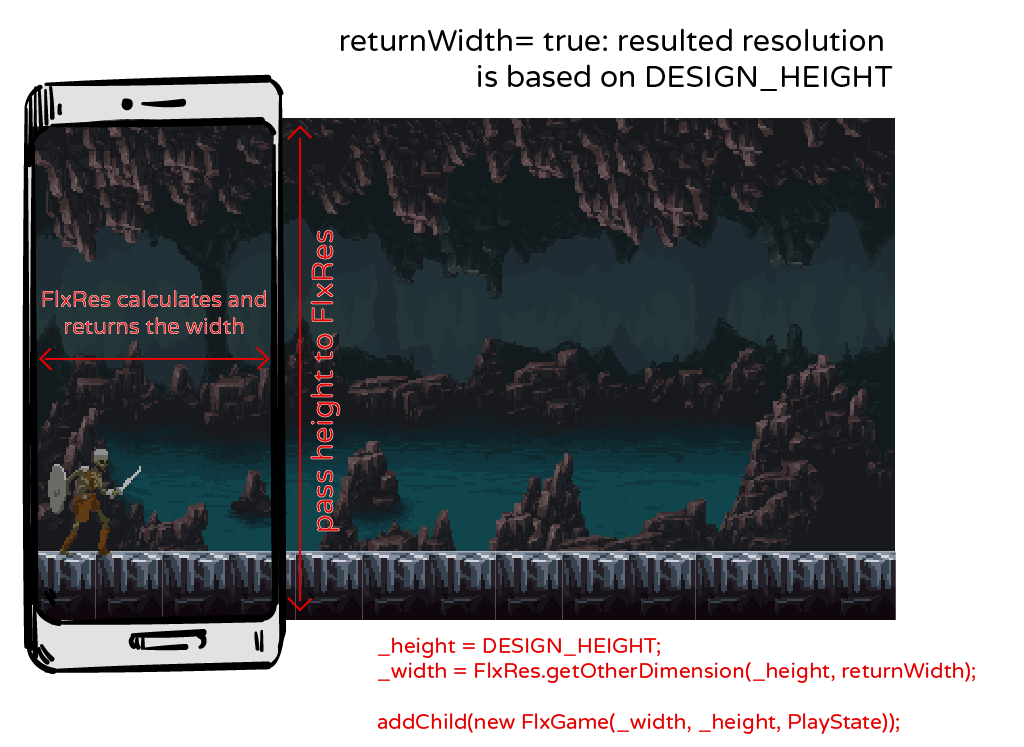
Can you tell the difference? The scene now is zoomed out and the ceiling of the cave is visible. Lets see why on the mobile sketch:
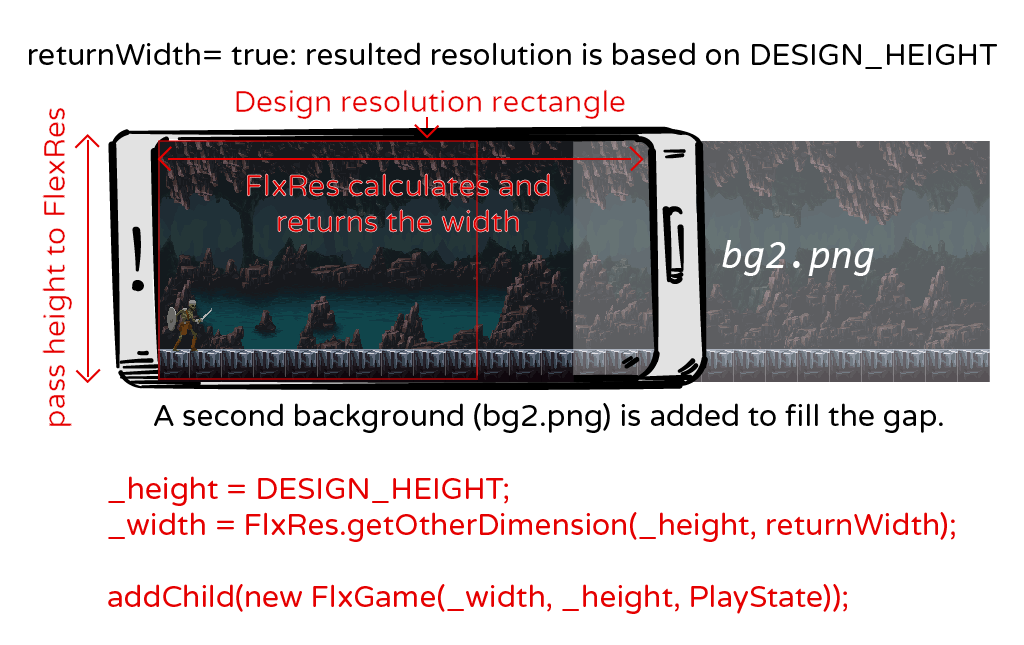
We are passing to FlexRes the design height, so the whole background (bg1.png) is visible because its height is 208px + 33 px the ground tile - 1 pixel of the ground tile that is drawing on top of background, total 240px the value we passed as desing height. FlxRes calculated and returned the width which is:
width = screenWidth * designHeight / screenHeight <=> width = 2280 * 250 / 1080 <=> width = 527.7
The resulted width is rounded down to 527 and will be raised to 528 in order to be an even number. The `bg1.png` width is only 416 so the `bg2.png` is positioned next to it, to fill the gap. If we try to evaluate the calculations : 528/250 = 2.11. The resulted ratio is the same up to second subdivision digit.
Handling extreme aspect ratios
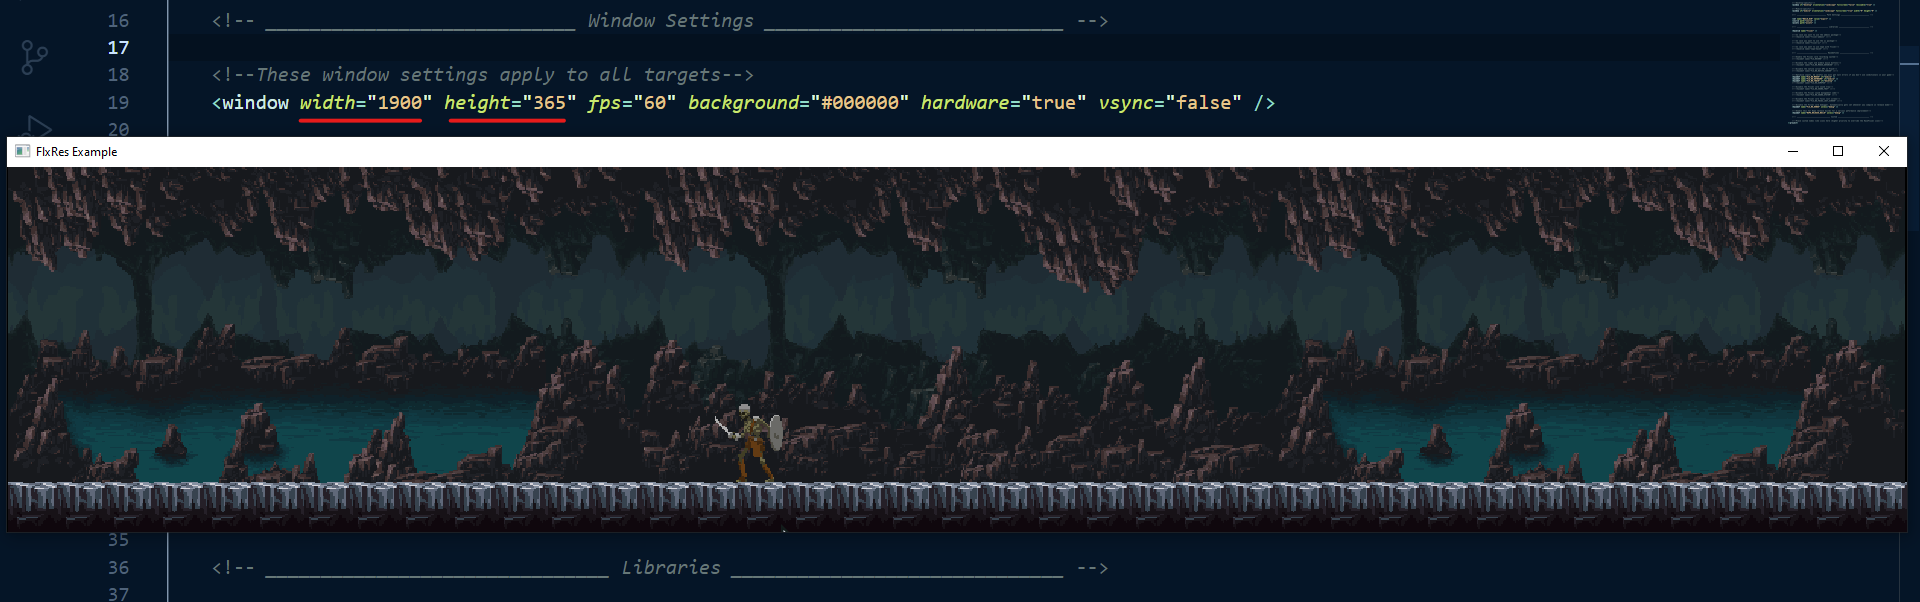
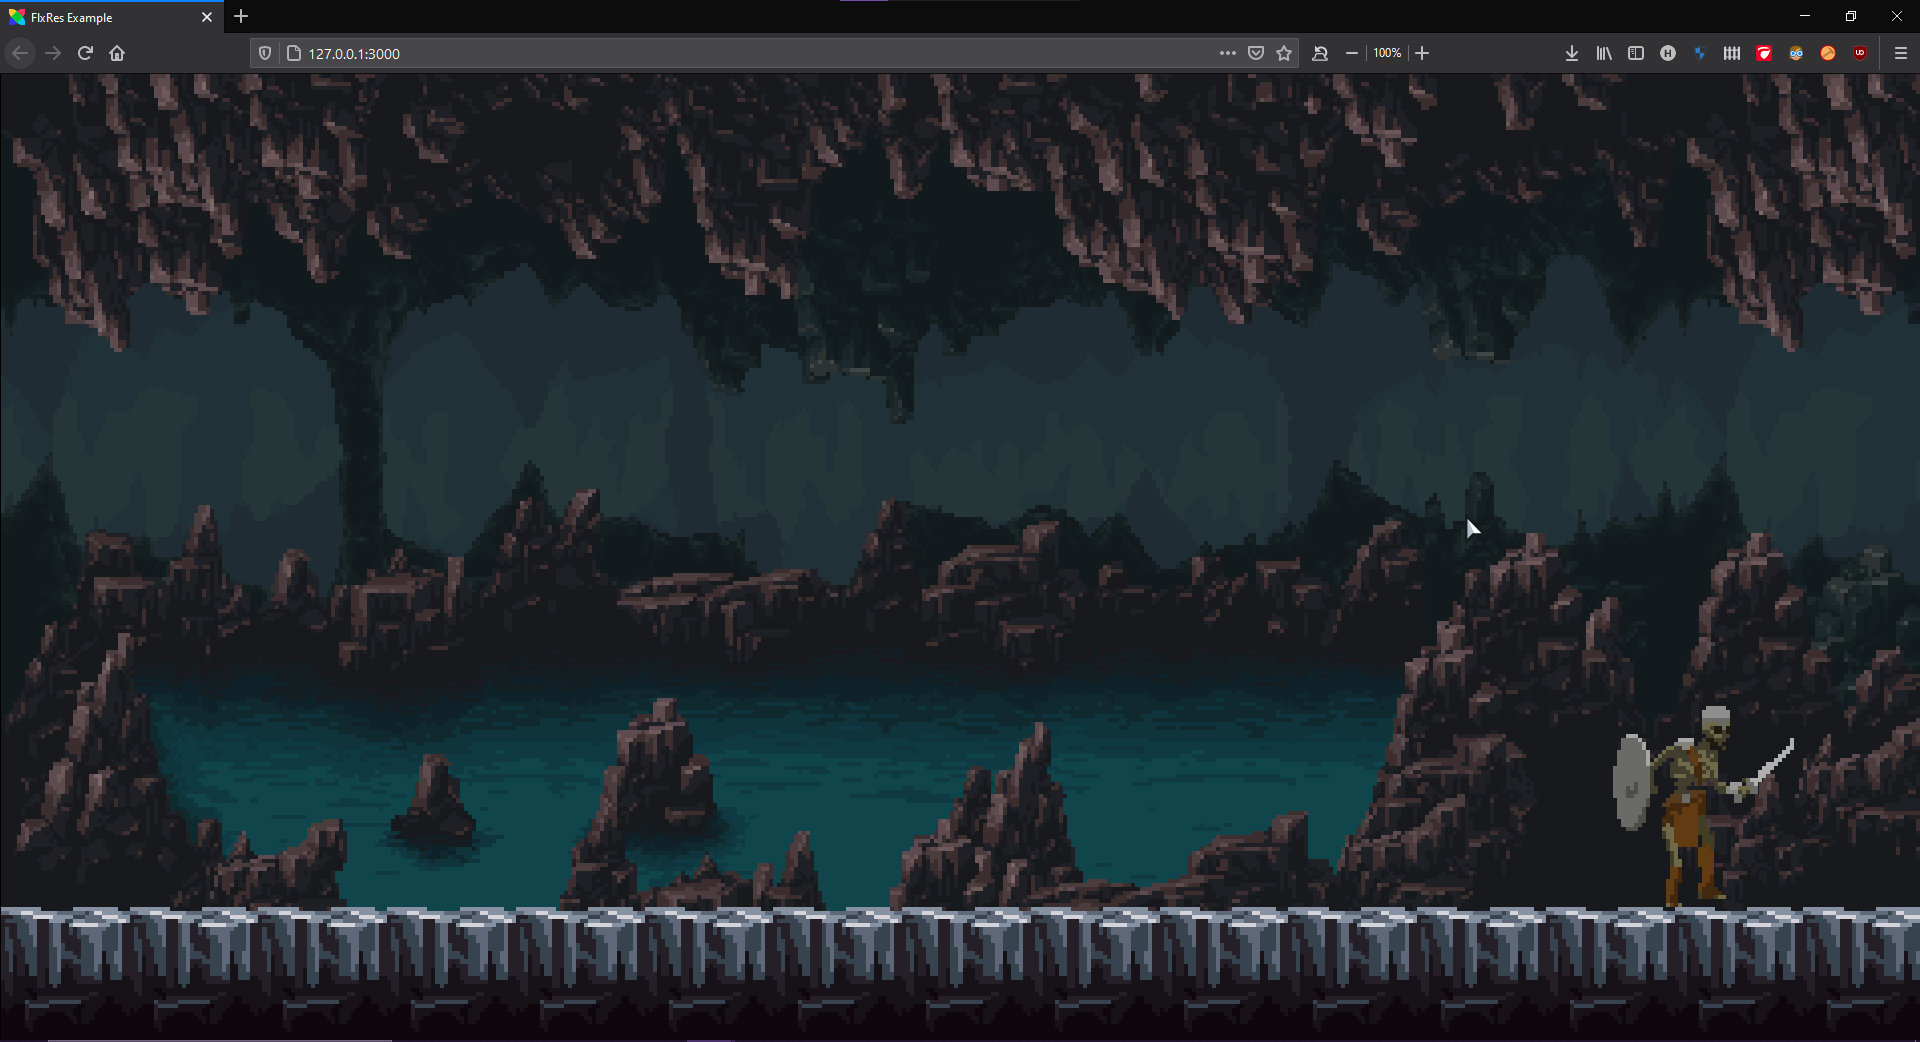
Just for fun and testing the FlxRes capabilities, lets try an extreme aspect ratio. Go to Project.xml and change at line 19 the width to 1900 and the height to 365. Build the game with neko or hashlink and see the extreme aspect ratio of 5.2 in action!
Using FlexRes on portrait orientation
Vertical monitors are not very common, so full screen portrait orientation makes more sense on mobile devices. By the other hand windowed portrait orientation seems to be fine at certain target platforms.
For testing this example project on portrait orientation, go to Project.xml and change the on line 19 the width to 480 and the height to 900 for testing on neko/haslink or just change the orientation to portrait on line 28 for testing on mobile.

Now you can repeat all the steps we did with landscape orientation and see the results. How this example looks if we pass the width and the returnWidth variable to false? How this example looks if we pass the height and the returnWidth variable to true? I will not go in detail, you should be able to do it on your own, but I will post some screenshots and if necessary, some comments.
Before everything else the mobile sketch on portrait orientation to see the screen dimensions:

Now to the builds:
The text "Hello from HaxeFlixel" on top, confirms that there is a stage there and not a black bar. This background seems to be poor choice with design width.

Design width vs design height
As you see, the ideal resolution for a game is either design width and whatever height or whatever width and design height. The reasons of declaration of both design width and design height in the beginning of this tutorial/readme are very solid:
- Designing with a solid predefined resolution will help you better decide if your game resolution will be based on design width or height.
- If you target more than one platform, it is possible to stick on different dimension depending the target platform and the needs of your game if such decision makes sense and compliments the game (eg you might need more zoomed action on the small mobile screen)
- And of course a a solid predefined resolution allows us to explore any option in this example project.
Additionally Choosing and sticking with one design value either for width or height, is based on many factors of the game, like game mechanics, orientation of action, orientation of scrolling... etc...
HTML5 builds
While HTML5 is the target platform I made all of my HaxeFlixel mini projects, I am not quite familiar with it. So I am not sure which is the best way to use FlxRes with HTML5, but I will demonstrate the two ways that I am aware of.
If you change the width and the height in `Project.xml` (line 19) as we did with the windowed neko or hashlink builds, those changes will affect the size of game area on the browser tab.

If you set the width and height to 0 in `Project.xml` (line 19) the game area will fill the whole browser tab.
But if you press F11 (browser goes full screen) a black bar will appear at the bottom.

Setting the returnWidth to true of false will affect the same as we saw so far.
Using high definition assets
The example project is based on pixel art assets, but you can use any style and size of assets that fits your game style. If you want to try FlxRes with FHD assets, search online find a picture with appropriate size or use your own assets if you have. Set the design width to 1920 and design height to 1080 and repeat the steps we did in this example.
Support this project
Here are some ways to support me and this project:
- You can give feedback, suggestions and bugs reports at the comments bellow.
- Contribute to this project. It is open source after all...
- Make a small optional donation when itch prompts you to download FlxRes
- Buy me a coffee
- Donate with PayPal
Credits
- The background is by Szadi art and you can find it here.
- The skeleton sprite is by LuizMelo and you can find it here.
Support those awesome artists!
Download
Click download now to get access to the following files:
Comments
Log in with itch.io to leave a comment.
Thank you very much for sharing this! Really helpful
I am glad that you find it useful, thank you!